
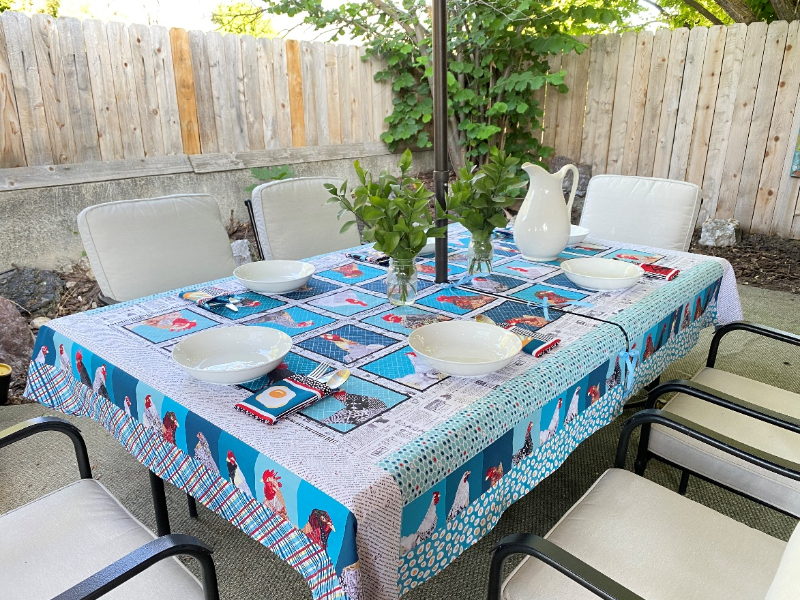
Umbrella-Friendly Tablecloth & Fabric Napkins
Featured Fabrics: Studio E Fabrics Zooming Chickens by Timna Tarr
Pattern Design by: Amy Simmonds
Sewn by: Amy Simmonds
Summertime calls to me! The sunny days and inviting warm evenings accompanied by the sweet songs of the birds in the trees are irresistible. I take every opportunity to sit in the shade and admire the myriad bees working hard in my vegetable and flower gardens. One of my favorite ways to spend time outside during the summer is to enjoy meals on the patio as often as the weather permits. Due to this love of backyard picnics, we invested in a large outdoor dining set that accommodates the whole family. The patio set we chose includes a hole for an umbrella, which provides both shade and protection from the messes created by any birds perched overhead. The only problem I found was that I couldn’t use a tablecloth and an umbrella simultaneously. Thanks to a few yards of cute fabric and a little time spent at my sewing machine, this is no longer a problem! In this tutorial, I will walk you through making your own umbrella-friendly tablecloth that you can set out, use, and remove without having to move the umbrella!

Skill Level: Beginner Friendly
Skills Learned: Basic Sewing
Finished Size: Any Size
Fabric Requirements: Identical Yardage will be needed for the Front & Back of the tablecloth – to determine your specific fabric needs, see steps 1 & 2. My table, for example, is 71” x 43” (180.34cm x 109.22cm) and would require either:3.5 yards (3.20m) of 108” (274.32cm) - 1 ¾ yards (1.60m) for the front & 1 ¾ yards (1.60m) for the back
OR
6 ½ yards (5.94m) of 42” (106.68cm) wide fabric - 3 ¼ yards (2.97m) for the front and 3 ¼ yards (2.97m) for the back
2 Panels for the center
• 36-inch (91.44cm) Panel - 7185-78 Teal-Red
1/2 Yard (.46m) of each of the following for borders:
• Newsprint - 7187-39 Off-White
• Diagonal Words - 7190-39 Off-White
• Diagonal Plaid - 7191-78 Teal-Red
• Egg Carton Geo - 7193-17 Light Teal
• Eggs - 7192-71 Blue Teal
1 Yard (.91m) for additional border:
• 4” Blocks - 7185-78 Teal-Red
1/2 Yard (.46m) for napkin fronts:
• Border Stripe - 7197-78 Teal-Red
1/3 Yard (.30m) of each for napkin backs:
• Hen Scratches - 7195-91 Charcoal
• Ombre Dot - 7189-76 Teal
• Tossed Feathers - 7186-78 Teal-Red
1 3/4 Yards (1.60m) Extra Wide (108”/274.32cm) for backing (not shown)

Additional Supplies & Equipment Needed:
1 ½ yards (1.37m) of 3/8” (.95cm) grosgrain ribbon
Sewing Machine with standard sewing foot
Iron and Ironing Surface, such as an ironing board or wool pressing mat
Rotary Cutter and Cutting Surface, such as a self-healing mat
Clear Quilters Ruler
Thread to match your project
Scissors
Pins or Sewing Clips
Pencil or preferred marking tool (chalk, heat erasable pen, etc)
Safety Pins
Chopstick
Tip: I recommend reading the instructions completely before starting your project.
Instructions:
NOTE: a ¼” seam allowance is used at all times unless otherwise noted.
Step 1: Calculating the size of the tablecloth
Measuring:
Measure the table you would like to cover, length and width, add 13” to each measurement. This will be the size you need to make your tablecloth front and tablecloth back.
*Example: For a 60” x 40” table, the size you will need to prepare will be 73” x 53”
Step 2: Fabric Options
Select Your Fabric:
A variety of fabrics can be used for this project. Here are some ideas:
• Panel with Borders: (This was my choice!) A tablecloth is a great way to use a panel as it can be a fun focal point. When using a panel, you will simply need to add borders to achieve the size needed (The borders I added were 3.5” wide, finished).
• Yardage: Yardage is a very simple option; it can even be a seamless option for small tables. If the size of the tablecloth needed measures over 40” in Length & Width, you simply sew two sections of yardage together to achieve the desired size (2 sections of standard yardage stitched together will be 80” wide).
• 108” Extra Wide: Extra wide fabric is the easiest option for large tables. Simply cut the extra wide yardage to the proper size.
Step 3: Gather Supplies

Step 4: Pre-wash and iron your fabrics (Optional)
Wash:
Whether or not you prewash your fabrics won’t necessarily change the outcome of your project; however, I choose to always pre-wash fabrics for 3 reasons.
• To identify any possible color bleeding.
• To handle any possible shrinkage ahead of time.
• To eliminate the manufacturer’s creases.
Tip: A color catcher will help save your fabrics if any bleeding does occur.

Iron:
Once clean and dried, iron your fabric as this allows you to measure and cut precisely.
Step 5: Preparing Tablecloth Front & Back
Cutting and Add any Borders if necessary:
You will need to prepare a Front and Back for your tablecloth, both pieces need to be the same size, see your measurements from step 1.
Panel Instructions:
Cut out your panel, add borders until you have achieved the desired tablecloth size, ironing seams open as you go. I like to keep things easy by adding simple borders. (See suggestions below)
Horizontal Borders: I cut borders to be the same length as the panel, and add as many (or as few) as needed to achieve the desired width.
Vertical Borders: I cut Vertical borders to be the same width as the Panel plus the Vertical borders. Add as many (or as few) borders as needed to achieve the desired length.
Yardage Instructions:
You will need 2 pieces of yardage that are WOF x the smaller of the 2 tablecloth measurements (either Length & Width). For the example below, 53” is the smaller dimension for the 53” x 73” tablecloth.
First, remove selvages using your rotary cutter and clear quilter’s ruler.
Place the fabrics right sides together and sew the two pieces together along the edges you just cut. Iron the seam open. If the fabric is directional, make sure patterns are aligned properly before sewing.
Extra Wide Fabric Instructions:
Simply cut your fabrics to size.
The examples below show how fabrics could be combined/cut to create a tablecloth that is 73” x 53” (The size needed for a 60 x 40” table).
Example 1 - Add multiple Borders to a Panel

Example 2 - Add wide Borders to a Panel

Combining 2 pieces of 42” wide yardage:
Cut 1 piece of Extra Wide Fabric to the size you need


Step 6: Sew Inside Out
Clip and Sew:
Once your front and back tablecloth pieces are ready, place them right sides together, pinning the edges to hold them in place.
Sew 1/4” from the edge around the perimeter, backstitching at the corners to reinforce them.
On one side, leave a 5” section un-sewn; this will allow you to put your hand inside to turn the tablecloth later.
Tip: I like to add 2 clips or pins side by side to remind me when to stop and start again. Be sure to backstitch when you stop for the opening, and backstitch again at the location where you resume sewing.

Step 7: Mark & Sew Umbrella Access
Mark the Center:
After stitching around the perimeter of the tablecloth, fold your tablecloth in half lengthwise, then widthwise. This will result in one corner that is the exact center of your tablecloth, using a marking tool, mark the center.
Note: The marking shown here was made on the tablecloth backing for easier photographing.

Mark for Umbrella Access:
Unfold the tablecloth and lay it on a flat, smooth surface. Around the mark you made in the center, mark a 2” circle. I traced around a large metal washer that was 2” in diameter. Draw a vertical line from the center of the tablecloth to the center of one of the lengthwise sides.


Mark for Ribbons:
Along the vertical line, you will need to mark 1/2” sections to Not Sew through. By not sewing in those 1/2” sections, small openings will be created that you can later insert ribbon into.
1. The first 1/2” opening should be marked 1” from the outside of the circle, on the vertical line.
2. The second 1/2” opening should be marked 6” from the outside edge, at the bottom of the vertical line.
3. The third 1/2” opening should be centered between openings 1 &2.

Step 8: Sewing the Umbrella Access
Pin Baste:
With the tablecloth still flat on a smooth surface, add safety pins all around the circle you have marked, and along both sides of the vertical line.
Be sure to leave room for the sewing foot to navigate without running over any safety pins. This will help prevent the fabric from shifting while you sew.

Sewing:
Starting at the bottom edge of the vertical line, sew 1/4” away from the marked line.
Do not stitch in the 1/2” sections that were marked, backstitch before and after each 1/2” opening.
When you reach the point where the stitching intersects the marked circle, sew around that circle directly on the circle marking until you’re 1/4” from the vertical line again.
Resume sewing 1/4” away from the vertical line along the opposite side, again backstitching before and after each of the 1/2” openings.
Note: This diagram does not show stitch lines for the circle, as the stitching should be done directly ON the circle markings, not next to it.
Note: This diagram does not show stitch lines for the circle, as the stitching should be done directly ON the circle markings, not next to it.
Shown here is one of the 1/2” openings, free from stitching, and the stitching around the circle.

Step 9: Cut, Clip Curves and Corners
Cut:
Carefully cut along the vertical marking you made and ¼” inside the stitched circle.

Clip Curves & Corners:
Make a small cut every 1/2” or so in the seam allowance of the circle, perpendicular to the stitching, being careful to not cut the stitching. This is referred to as clipping curves.
Doing this will give you a smoother circle when the tablecloth is turned and the edges ironed.
Clip the 6 corners on the tablecloth, to reduce bulk. (4 outside corners, and the 2 corners that were created when you cut along the vertical line.)


Step 10: Turn Right Side Out
Turning:
Reach inside the 5” opening, grab the corner that is farthest away from the opening, and begin to pull the tablecloth right side out. Do this slowly and carefully to avoid stretching the opening or popping any stitches.
Shape Corners:
Once turned right side out, use a chopstick (or a similarly skinny item) on the inside to push the corners out and shape them.


Step 11: Preparing the Ribbons
Hem Ribbons:
Cut 6 pieces of 3/8” grosgrain ribbon to be 12” long.
To prevent the ribbon from fraying, hem each ribbon end, approximately 1/2”. To do this fold over 1/2” of ribbon, then fold 1/2” again, and stitch to secure. Repeat for both ends of all 6 ribbons.
Note: I didn’t use matching thread so the stitching would show up better in photos. I would recommend using matching thread for your own project.

Step 12: Finishing
Iron:
Once the tablecloth is fully right side out and corners have been shaped; iron along the entire perimeter of the tablecloth including along the edges of the umbrella access.
Tip: Rolling the seam between your fingers will help bring the seam to the outside for crisp edges!
Before Ironing
After Ironing

Closing the 5” opening:
When you are ready to iron the 5” opening, carefully finger-press the fabrics first, this will help you achieve a straight finished edge despite the lack of internal seam.
After ironing, I also recommend adding pins along the 5” opening to secure the alignment of the front and back edges while topstitching.

Insert Ribbons:
Locate the Six 1/2” openings that are along the umbrella access, insert one ribbon about ½” deep into each opening and pin to secure.

Top Stitching:
Top stitch 1/8” from the edge, along the perimeter, pivoting at corners.
When top stitching along the umbrella access, stitch along the vertical edges and around the circle, backstitching over the ribbons to reinforce.
Tip: To Pivot: Stop sewing, lower the needle into the down position. Lift the presser foot, rotate the fabric to the new direction you with to sew, lower the presser foot again and resume sewing.
Finished! Place your tablecloth on your table, secure the gap by tying the ribbons, not only will they keep the tablecloth from shifting, they also add charm to your table setting!
When finished simply un-tie and take it off – no need to remove the umbrella ever again! So Easy!

Bonus Mini Tutorial -- Fabric Napkins
With any leftover or coordinating fabric, you may want to make some fabric napkins to go with your new tablecloth. They are a quick and easy addition. The process is similar to the construction of the tablecloth but on a much smaller scale.
Step 1: Cut
Cut 2 – 12 ½” Squares of fabric (for front and back)

Step 2: Sew
With right sides together clip or pin the squares to hold them in position.
Starting about 4” away from a corner, sew ¼” from the edge around the perimeter, pivot and backstitch at each corner, and stop 2” from your starting point.
This 2” opening will be used to turn the napkin right side out.
Clip the corners.


Step 3: Finishing
Reaching through the 2” opening, turn the napkin right sides out. Use a chopstick to push out and shape the corners.

Iron along all sides, add pins to secure the alignment of the front and back fabrics at the opening, and then topstitch 1/8” from the edge around the perimeter, pivoting at the corners.

Finished! An easy way to add interest to your table is to fold the napkins nearly in half then in thirds, this creates a pocket you can tuck the silverware into!

Washing and Care:
Your new tablecloth and fabric napkins will be machine washable, that way every meal can be stress-free even if the kids make a mess! Tumble or hang to air dry. A quick ironing and your tablecloth and napkins will be good as new and ready for your next summer backyard picnic.
Happy Sewing!
Fabric Details:
To view the complete Studio E Fabrics Zooming Chickens by Timna Tarr click here.
To find a retailer near you click here.
_________________________-
Learn more about Amy here.


Comments are closed.